Roasted Asparagus

Roasted asparagus is one of my new favorite foods. Back when asparagus was a little more in season, I made it at least twice a week. It’s so easy and so delicious. So easy and so delicious that it hardly needs more of a description than that. That and the fact that I’m pretty tired from spending most of this evening in the lab (where I’m doing my senior thesis work) collecting E. coli cells, lysing them, and filling a tiny test tube with their DNA (to put it in somewhat understandable words). But believe me, I’d much rather think about asparagus than E. coli.

Anyway, there are endless variations to seasoning roasted asparagus. A drizzle of olive oil and a sprinkling of sea salt makes a lovely, simple seasoning. Or you can get a little fancier with Parmesan cheese, garlic, and lemon juice. It’s so easy to experiment! The amounts I’m giving here are just a starting point, I don’t really measure these ingredients anymore. You can also roast zucchini in a similar same way. Roasted vegetables are the perfect side dish for almost any meal.


Roasted Asparagus

1 lb or so asparagus (one bunch)
2 Tbsp olive oil
2 Tbsp grated parmesan cheese
1-2 cloves minced garlic (or you can omit the salt and fresh garlic and use a teaspoon or so of garlic salt)
dash or two sea salt
dash or two ground pepper
lemon juice

Preheat the oven to 425° F. Line a baking sheet with foil and spray with cooking spray or spread a little oil on it. Toss the asparagus (washed, with the tough ends snapped off) with all the ingredients except the lemon juice. Spread the asparagus over the baking sheet in a single layer.

Bake 8-10 minutes. Check after 8 minutes–pierce one stalk with a fork to check and cook a few more minutes until the asparagus reaches your desired tenderness. (8 minutes is usually perfect for me.) Drizzle the lemon juice over the asparagus when it’s done.

Chocolate Eclairs

Chocolate eclairs are beautiful and delicious, the very best combination. I first tried making eclairs a couple of years ago, when I was inspired by a fancy cookbook a dear friend gave me for Christmas: Best-Ever Pastry Cookbook. It’s a fancy British cookbook with chapter titles like “Elegant Fruit Pastries” and “Rich and Indulgent Pastry Desserts,” filled with colorful, glossy photos of all sorts of pastries, tarts, parcels, and pies both sweet and savory. It was my dream come true. By the 1st of January I was done drooling over the elaborate recipes and gorgeous photos and ready to try making something. The eclairs were the first recipe I tried from the cookbook and I was pleasantly surprised by how easy the process was.

At first glance an eclair seems an intimidating dessert to make–that impressive, beautifully shaped puffy pastry, the fluffy whipped cream, and the silky chocolate topping. But in reality, each component requires only a simple, straight-forward process. I truly believe that if you can read and possess enough common sense, you can be successful making almost any recipe. Even a chocolate eclair.

You can make a beautiful chocolate eclair even if you don’t own a pastry bag. Here’s my sad little story: I was at home during Christmas break of my freshman year of college and I wanted to make eclairs. But there was not a single pastry bag in the house. Which seemed very necessary for piping the pastry and the cream. But then my mom suggested that I use a ziploc bag and cut one of the corners off. I was slightly mortified (and certainly never dreamed of admitting this fact to so many people on a blog), but I agreed that it was the way to solve the problem. And guess what, a ziploc bag works wonderfully. Obviously I’m not professional and I’ve never tried it with a pastry bag, but in this case a substitute works just fine.

For me, eclairs are just fun to make. Although it’s a straight-forward process, it does require attention to detail. But you end up with an impressive looking and extremely tasty dessert. In the time that it takes the choux pastry to bake, you can easily whip the cream and melt the chocolate. Give it a try, you might be surprised just how easy it is.

Chocolate Eclairs

Recipe adapted from Best-Ever Pastry Cookbook, by Catherine Atkinson

Makes 7-9 eclairs.

For the Choux Pastry

9 Tbsp all-purpose flour
a pinch of salt
1/4 cup butter, diced
2/3 cup water
2 eggs, lightly beaten

Preheat the oven to 400 F. Grease a baking sheet and line it with parchment paper (you can skip the parchment paper if you don’t have any).

Sift the four and salt onto a sheet of parchment paper or into a small bowl. Then heat the butter and water in a saucepan over low heat, until the butter melts. When the butter has melted, increase the heat to medium-high and bring it to a rolling boil. Take the pan off the burner and add the flour and salt all at once. Beat this mixture thoroughly with a wodden spoon, until all the flour and salt is mixed in.

Put the saucepan back on the burner over low heat and beat the mixture until all of it leaves the sides of the pan and forms a big ball. It will look something like this: (it all sticks together, kind of like a big glob of sticky playdough)

Then set this pan aside to cool for 2-3 minutes. After the mixture is somewhat cooled, add the beaten eggs, in about 2 or 3 additions. After each addition, beat the dough well. You will have a thick, smooth, shiny paste after all the eggs are added.

Transfer the choux pastry into a pastry bag (or a ziploc bag) with a 1 inch tip (or one corner cut off to the length of 1 inch) and pipe lengths of pastry approximately 4 inches long onto the baking sheet. You can use a dull knife dipped in water to cleanly cut the pastry from the pastry bag. You can also use wet fingers to smooth over any imperfections in the piped choux pastry shapes.

Bake for 25-30 minutes, until the pastry is golden brown and well-risen (check them after 25 minutes!). Take the pastries out of the oven and use a clean, sharp knife to cut a slit along the side of each pastry (this releases the steam). Bake the pastries for about 3-5 minutes longer. Then cool them on a wire rack.

For the cream filling

1 1/4 cups heavy whipping cream
2 tsp confectioners’ sugar, sifted
1/4 tsp vanilla extract

Whip the cream, sugar, and vanilla until it holds its shape. Be careful not to overwhip. Fill a pastry bag (or ziploc bag) fitted with a 1/2 inch nozzle (or a corner cut off to a 1/2 inch) with the cream and fill the cooled eclairs.

For the chocolate topping

4 oz semisweet chocolate (or chocolate chips)
2 Tbsp water
2 Tbsp butter

In a double boiler, melt the chocolate and water. Stir until smooth. Remove the pan and gradually stir in the butter until everything is melted and smooth.

Carefully spoon the melted chocolate on top of each cream-filled eclair. Allow the chocolate to set, then eat as soon as possible (or refrigerate for up to 2 days at the most).

Watermelon Mint Salad

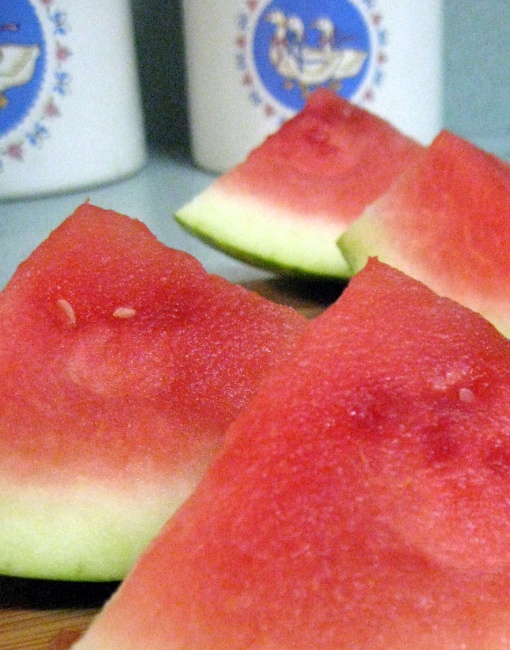
Last Saturday at the farmers’ market I just could not pass up the giant piles of watermelons. We picked out a cute little one and delightedly carried it home. Except that little watermelon didn’t feel so little anymore on the walk home, on a 95° afternoon, stuffed in a huge bag overflowing with zucchini, peaches, tomatoes, and corn. But it was well worth it the sweaty walk home. After a bit of discussion about how to properly cut the watermelon (reminiscent of my near-fiasco with the mango last week), I just went for it and we were rewarded with perfectly juicy red slices of watermelon, one of the best summertime foods.

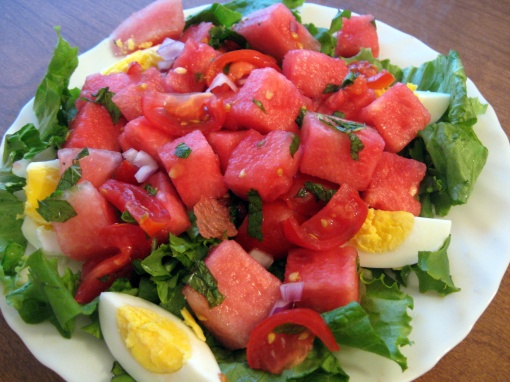
We were further rewarded when Wing found this recipe for a watermelon mint salad. I’d never tried watermelon with mint before, but I was intrigued and was pleased to discover that it is an excellent combination. This salad is full of flavor. I was a little unsure of how the hard-boiled egg would taste, but I ended up loving it. It provides a nice contrast to the juicy watermelon.

This is also simply a beautiful salad. Visually stunning, as Wing said. I love colorful things and this salad is very colorful: rosy red watermelon, crispy green lettuce, shiny purple onions, and soft white and yellow eggs. It works well as a main dish over lettuce, but it’s also good without the lettuce. It’s very easy to adjust the amounts of ingredients to your tastes and the number of people you’re serving. If you’re not particularly fond of raw red onion, I’d cut it down to closer to 1 tablespoon. The number of tomatoes and amount of mint are also easy to adjust, experiment and find out what you like the best.

P.S. Check out my updated About section!

Watermelon Mint Salad

Recipe adapted from Baltic Maid

lettuce, chopped
3 -3 1/2 cups watermelon, cut into cubes
12 cherry tomatoes, halved
1 1/2 – 2 Tbsp finely minced red onion
1 handful fresh mint leaves, cut into small strips
3 hard boiled eggs, quartered

Hard boil three eggs. While they’re cooking, chop the lettuce, watermelon, tomatoes, onions, and mint. Combine all of these ingredients in a large bowl. Divide the salad among individual plates and then add the quartered eggs (they’ll crumble pretty easily if added directly to the salad).

Fudge

This is another of my grandma’s very tasty recipes. To me, the taste of this fudge means Christmastime. We usually only make it at Christmas, along with hundreds and hundreds of Christmas cookies and various types of sweet breads. Why not have a little taste of Christmas in August? It’s only four months away! ;)

This fudge recipe is very easy to make and so rich and chocolatey. It’s so easy that it was one of the few desserts I’d make when I still lived in a dorm. It’s also college-student friendly in that you can use any shape of cake pan for the finished batch. I usually end up putting it into round cake pans because for some reason none of us own square cake pans. It’s delicious with or without nuts–I usually make a double batch and add nuts to one pan. It’s important to use a really big pot (5 or 6 quarts) if you make a double batch though, otherwise you’ll end up with a hot, sticky, marshmallow mess all over the stove-top. Not fun to clean up.

As I sit here writing about fudge, there are two things one my mind. Neither of which have the slightest to do with fudge or even food. Those things are: the first day of my 17th consecutive year of school is one week from tomorrow. Also known as the first day of my senior year of college, at a school that I love, which is filled with wonderful people I also love. It’s going to a be a doozy of a year. But in a great way. I can’t wait!

The second thing (which oddly enough is occupying my brain more than the prospect of school starting next week) is that I have three adorable little cactus plants sitting on the table staring at me as I type this. I bought them on a whim today at Home Depot (one of MANY trips to Home Depot this summer, it’s a long story). I chose two of them based on their names (Baby Toes and Little Jewel. How awesome is that?!), just like I judge paint colors and mixed drinks by their names. When I was ten I begged my mom to buy me a cactus that I fell in love with at Rite Aid (it was the most stereotypically-cactus-looking cactus you can imagine and about three inches tall). I named him Harold (or maybe Oscar?), lovingly planted him in a hand-painted ceramic pot I’d made earlier that week at Girl Scout Day Camp, then promptly forgot about the poor thing. These new little guys will hopefully relieve my guilty conscience over Harold/Oscar’s fate so many years ago. I’ll keep you updated on their progress and likely post a picture soon :)

But enough about cacti, go eat some fudge and enjoy your last few days of summer!

Fudge

**If you double this recipe use a 5 or 6 quart pot or it will boil over and make a HUGE mess. A single recipe can be made in a 3 quart pot. **

Put the following ingredients into a large bowl:

6 oz chocolate chips
1 stick of butter or stick margarine
1 cup walnuts (optional)
1 teaspoon vanilla

Put the following into the proper size of pot:

2 cups sugar
6 oz of evaporated milk (which is half a normal, 12 ounce can that you’d buy at the store)
part of the stick of butter from the bowl

Bring these three ingredients (sugar, evaporated milk, part of the butter) to a boil over medium-high heat, stirring the whole time. When the mixture is boiling, add:

10 large marshmallows or 1 cup miniature marshmallows

Boil for 6 minutes, stirring vigorously the whole time. Until the mixture looks a little something like this:

Pour the marshmallow mixture from the pot into the bowl with the chocolate chips. Stir together until melted everything is melted and well-combined, then pour into pan. (A single batch will fill one square or round cake pan, a double batch will fill two square or round cake pans or one 9×13 rectangular pan.)

Hawaiian Meatballs

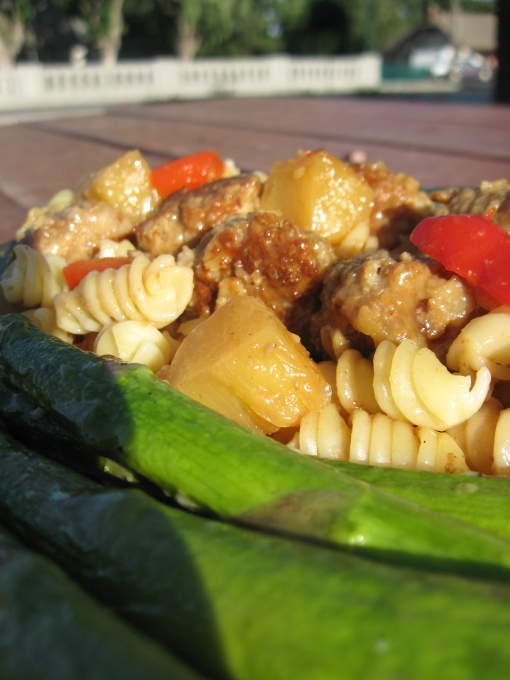
These meatballs are a classic family recipe. Growing up, whenever my mom asked me what I wanted for dinner, without a pause, I would reply “meatballs!” I don’t know that there’s anything particularly Hawaiian about them, other than the fact that pineapple is included in the recipe, but they definitely make an excellent dinner. This is a dependable recipe that’s always good no matter what.

Hawaiian meatballs have become a regular at college as well, I frequently make them when we have friends over for dinner. One recipe can easily feed five or six people and I’ve never met someone who didn’t like them. My friend Michael even got upset when we forgot to invite him over one night when we had meatballs for dinner.

Another reason I like this recipe is that it’s easily adaptable to several substitutions, which is especially nice when you’re in college and you occasionally find yourself without milk or oatmeal and no time to run to the store due to the ridiculous amounts of homework you have to do. You can serve these meatballs over rice or pasta. The vegetables can be switched up too–any color of bell pepper and I even made them with carrots once. Water can easily substitute the milk. And once, in a moment of desperation, I used ground up Wheat Thins in place of the oatmeal. It worked like a charm.

Hawaiian Meatballs

Serves 5-6.

Meatballs

1½ pounds ground turkey or beef
2/3 cup oatmeal or cracker crumbs
1 egg
1 tsp salt
¼ tsp ginger
¼ cup milk

oil

Sauce

2 Tbsp cornstarch
½ cup brown sugar
1 can pineapple, drain and reserve juice
1/3 cup vinegar
1 Tbsp soy sauce
½ cup chopped green (or any color) pepper

In a large bowl, mix together the first 6 ingredients (meat through milk) with your hands. Shape into balls, approximately a tablespoonful for each meatball. Heat enough oil to just cover the bottom of a large skillet. On medium high heat, brown and cook the meatballs through. Remove the meatballs from the skillet and keep them warm while you make the sauce. Pour out any fat from the skillet.

To make the sauce, mix together cornstarch and sugar in a medium sized bowl. Stir in the reserved pineapple juice, vinegar, and soy sauce until it’s smooth (whisking speeds this along). Pour the sauce into the skillet (still on medium heat) and stir it constantly until it thickens and boils. Then boil and stir for about one minute. Add the meatballs, pineapple, and peppers and stir together until heated through.

A Tasty Lentil Salad

I grew up in a land of lentils. Nestled among the softly rolling hills of a region called the Palouse, my hometown grows a third of the nation’s lentils. We are also the proud home of the National Lentil Festival, held at the end of each summer. Back home, the festival is just starting and will continue all weekend. This post is in honor of the Lentil Festival and for my love of my little hometown and its tasty lentils.

This is one of the only times in my life that I’ve missed the Lentil Festival. It was the big event of the summer in a little town like mine (known only for its lentils and the state university that makes up more than half the population); it signified the bittersweet end of summer but meant a weekend of entertainment, delicious food, and catching up with friends before school started the following week.

In the last several years the Lentil Festival has increased in size and popularity. The Friday night street fair now offers the world’s Largest Bowl of Lentil Chili (which holds something like 350 gallons, I believe), a hearty, delicious, and spicy chili that I love. On Saturday morning there’s a parade that travels through all four blocks of downtown and features the festival’s mascot Tase T. Lentil riding the Lentil Express train car. Afterwards, the park downtown has all kinds of activities to keep a person occupied and full of lentils. My personal favorites are the lentil ice cream made by the local ice cream parlor (it’s creamy, crunchy, and nutty) and the sampling portion of the Legendary Lentil Cook-Off. People all across the country (I’m not kidding) send in recipes for this contest. The top six recipes are then tasted by lucky people at the festival like me, who then vote on their favorites. In recent years, as fewer of my friends are in town for the festival, the cook-off has been one of my main motivations to go to the festival. There is always such an interesting assortment of dishes to sample–from tarts and cakes to soups, dips, and salads. You can check out last year’s recipes here.

I’ve always liked lentils and this summer I’ve discovered several easy ways to prepare them. One of my favorites was this lentil salad recipe that I stumbled on the other week. It’s a great salad: summery, full of vegetables, and simple to personalize according to your tastes. It also fed me and my housemate for at least three days :)

A Tasty Lentil Salad

Recipe adapted from Alice Waters’ Lentil Salad

1 cup lentils
1 Tbsp red wine vinegar
salt, to taste
black pepper, to taste
3 Tbsp extra-virgin olive oil
2 -3 Tbsp finely diced shallot
3 Tbsp chopped parsley

optional ingredients
1/2 cup cucumber, chopped
1/4 cup each of carrot, celery, and/or onion: cook in a frying pan in a drizzle of olive oil until tender; cool before adding to the salad
1/4 cup red,orange, or yellow sweet bell pepper: season with a few dashes of sea salt (or regular salt) and let stand for 10-15 minutes (to soften) before adding to the salad
feta cheese for garnish

Sort and rinse the lentils, then place them in a saucepan and cover with water by about 3 inches. Bring to a boil. After it comes to a boil, turn the heat down to a simmer and cook for about 30 minutes, until the lentils are tender. (You can reserve a 1/2 cup of the cooking liquid in case the lentils are stuck together later, but I found I didn’t need to use my reserved cooking liquid.)

Transfer the lentils to a large bowl and then toss with the red wine vinegar, salt, and black pepper. Let the lentils sit about 10 minutes, then add more red wine vinegar, salt, and/or pepper to taste.

In a small bowl, combine the olive oil, shallots, and parsley. Add this mixture to the lentils and toss well. At this point add a little of the reserved cooking liquid if needed to loosen dry or stuck together lentils.

Add optional vegetables and/or garnish with feta. This salad keeps well for a couple of days in the fridge, add feta only at the time of serving to avoid soggy cheese.

Molasses Cookies

If cherry pie was the pie of my childhood, then molasses cookies were most definitely the cookie of my childhood. They are another dessert introduced to me by my grandma, her molasses cookies have always been my very favorite cookie.

Every single time I visited my grandparent’s house my grandma had molasses cookies for me (even more often than the cherry pie) because she knew they were my favorite. If they weren’t freshly baked then she would pull some out of the freezer and they tasted just as good. I loved walking into my grandma’s bright, forever-squeaky-clean kitchen with its little vases of violets on the window sill next to the shiny blue glass bird, the brown stool next to the old phone where I would sit and watch people cook, and pulling one of her cookie jars out of the cupboard. And inside the cookie jar: those delicious, crunchy on the edges, soft and chewy in the middle, gingery, molasses cookies. Heaven. I also love that she had cookie jars. My mom never had one, we always kept our cookies in a tupperware type box in the drawer, if they lasted that long–cookies do disappear quickly with four girls in the house. My grandma’s cookie jars weren’t fancy, but I remember them exactly: one squat, perfectly smooth and white with a silver handle; the other a simple tin canister with a black lid. But the contents of those jars were the real treasure–mmm, it couldn’t get any better than my grandma’s cookies. I’m pretty sure my nephew knew where those cookie jars were kept by the time he was two.

I have so many lovely memories of being at my grandparent’s house. They lived about four hours away from us, so we went there pretty frequently. Almost every summer my sisters and I would stay with them for a week without our parents. Their house was always sparkling clean and so very quiet, until we got there anyway. Everything was always exactly the same and very predictable–something that my young, adverse-to-change little self quite appreciated. I can still imagine the smell of their house perfectly (if you can imagine a smell?), although I’m not sure I can describe it very well: old but clean, freshly-baked cookies, and like my grandparents. I loved the room that was my mom’s growing up. It had two twin beds, one on each side of the room, covered in identical pink bedspreads. They reminded me of cake. (And you know I love pink cake.) There was a vanity with a huge round mirror; in front of it there was a piano shaped music box, the ballerina inside had a real tulle skirt and danced to Für Elise.

The closet in that bedroom was full of all kinds of cool old toys that had been my mom’s: old board games like Go to the Head of the Class and Uncle Wiggly, one of the original Barbies with lots of clothes made by my mom and grandma, stuffed animals and a Thumbelina baby doll that could move her head, big baby Mary (a toddler sized plastic baby doll with such a pretty little face and the BEST clothes–she had little dresses with matching diapers and bonnets, all of which were neatly hung in the closet), and best of all, the little Kiddles. And I know this has absolutely nothing to do with food, but my sisters will appreciate this (this is for you, Julia), I photographed the Kiddles the last time I was at home. They are these adorable little dolls that lived in plastic houses and had all kinds of accessories.

That closet always freaked me out a little bit though: you could walk inside it and shut the door–which made it too easy to become accidentally shut inside (or have a big sister shut you inside….). Not to mention the furnace that occupied half of it, which likely scared me because my sisters had taught me that the furnace at home was haunted by a ghost named the Jolly Baker. There were never any ghosts assigned to the slightly scary closet at grandma and grandpa’s house, but I was always sure to leave the door wide open when I went in.

But back to the cookies: I decided to do a dessert post today partly in celebration of my sister’s birthday–Happy 31st Birthday Julia! (She assures me that she still doesn’t feel a bit old); and partly because it’s also my half birthday! I’ve always enjoyed the fact that my oldest sister and I are exactly nine and a half years apart. I like it when things work out so exactly :)

To this day I still can’t make molasses cookies exactly the way my grandma used to. I’ve tried plenty of times, but they always turn out smaller and less sugary. Though I must admit, still very tasty. I do love these cookies and they make me miss my grandma very much. She passed away about a year and a half ago and lately I’ve found myself thinking about her more while I’m working in the kitchen. She was the sweetest and most dear grandma a person could ever have and she did everything with such love. I like to remember her when I’m baking, remember how graciously and lovingly she baked and cooked and raised her children and adored her grandchildren. I’m glad that I can remember her in such a meaningful way by baking her delicious cookies.

Molasses Cookies

3/4 cup shortening
1 cup packed brown sugar
1/4 cup mild-flavor molasses or full-flavor molasses
1 egg
2 1/4 cups all-purpose flour
2 teaspoons baking soda
1 teaspoon ground cinnamon
1 teaspoon ground ginger
1/2 teaspoon ground cloves
1/4 teaspoon salt
Granulated sugar

With a wooden spoon, mix shortening, brown sugar, molasses and egg thoroughly in large bowl. Stir in the remaining ingredients except granulated sugar. Cover and refrigerate at least 2 hours.

Preheat the oven to 374 and grease a cookie sheet. Shape the dough into about 1 1/4-inch balls. Dip the tops in granulated sugar. Place the balls, sugared sides up, about 3 inches apart on the cookie sheet. Sprinkle each with 2 or 3 drops of water. (If you want the tops to be really sugary, sprinkle a tiny bit more sugar on the ball of dough after the water.)

Bake 10 to 12 minutes or just until set but not hard. Remove from the cookie sheet and cool on a wire rack.

Mini Zucchini Fritters

I love the farmers market. But then again, who doesn’t? This summer it’s become a Saturday morning (late morning if we’re being exact) tradition for me and my housemate. We wander the market for awhile: admire the piles of luscious red raspberries and plump blackberries, heaps of pearly white onions, bunches of fresh greens and herbs, piles of tomatoes, corn, watermelon, and zucchini, drool over the homemade cupcakes and breads, take in all the smells (do I want Egyptian falafel or a sweet onion sausage for lunch?) people-watch (Wing loves pointing out the cutest dogs to me, while I point out and describe the personality of all the kids who go to the daycare where I work during the year), and then finally make the difficult decision of what to buy. As a nearly-broke college student, I can’t buy every single berry and melon I see, even though I would very much like to. Some difficult decisions have to be made.

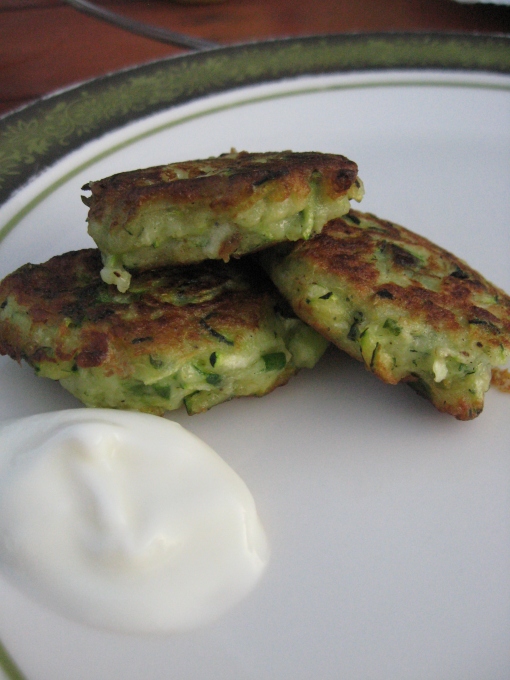
And last week was a week of zucchini. Relatively cheap, delicious, and versatile–the perfect choice. Zucchini was the side dish of choice for several days: roasted zucchini, zucchini fries (I haven’t found a share-able recipe for these yet, but I’m working on it), and these awesome little fritters. They were so easy to make and were a very nice, crispy little side dish. You can also easily refrigerate the batter if you don’t want to make them all at once (especially if you’re only making them for two people, like I was).

The original recipe that I looked at serves these fritters with a goat cheese sauce. I adore goat cheese. I fell in love with it last summer, when I made one of the most things delicious things I have ever eaten in my life: goat cheese tarts with fresh blackberries (coming soon in a new post, I PROMISE!). The following fall while I was in Spain I ate it whenever I got the chance, usually topped with honey and pine nuts (more on Spain later as well!). Anyway, we were fresh out of goat cheese the day I made these zucchini fritters, so we made do serving them with plain yogurt, which was also very good. The other change I made was adding a little spice. I made half the batch for dinner one day without spice, then made the rest a few days later for lunch. The second time I decided that a little cayenne pepper just might add a perfect little kick of spiciness and make these fritters even better. And it did!

I’m looking forward to the farmers market this weekend—not only for more zucchini (I want to try zucchini bread this week), but also for the berries so I can finally make those goat cheese tarts again :)

Zucchini Fritters

Recipe adapted from Pinch of Yum

1 medium zucchini, grated
1/2 tsp salt
zest of 1 lemon
a handful of chopped parsley
2 chopped green onions
1 egg
a dash or two of pepper
1/2 cup flour
1/8 tsp-ish cayenne pepper (optional, amount varies depending on taste)
oil for frying
plain yogurt for serving

Grate the zucchini–just chop off the stem end and grate that thing! (I wasn’t sure how to best grate a zucchini, but after googling it it turned out to be a very easy job.) Mix all ingredients except the oil and yogurt together until they’re well-combined.  Heat oil (maybe 2-3 Tbsp, just enough to cover the skillet, add more as needed) in a large skillet on medium heat. Use a tablespoon to drop little rounded zucchini patties into the oil. Fry on each side until golden brown and crispy. Serve with yogurt on the side.

Curry Turkey Burgers

At some point during my childhood, my parents began using lean ground turkey in place of ground beef. I know they had good reasons for the switch, but I, in my youthful foolishness (and stubborn dislike of any sort of change, large or small) resisted this change with all my might. I was suspicious of every dish my mom made, always on the lookout for this strange awful new infiltrator called ground turkey. The funniest part about it was that I could hardly even tell the difference between the two. It became a family joke: my mom or dad would ask me at the end of a meal if I’d realized the meatballs were ground turkey and I would be absolutely horrified to hear the truth. I’m pretty sure it was an excellent source of amusement for my parents (as are many things having to do with their youngest daughter).

Anyway, although my younger self would be disappointed in me, I have to say that I no longer have anything against ground turkey. Which would explain why last week found me searching for recipes in which to use the ground turkey breast sitting in my freezer. I stumbled across this recipe and it’s definitely a keeper.

Mango and its cross section

Image via Wikipedia

One of the best parts about these burgers was the slices of mango that we topped them with. Various events last week led to me having an entire lovely day at home–no work, no responsibilities, no nothing. Nothing except dinner to make, which was a task I thoroughly enjoyed. I had the time to find this delicious recipe and a chance to go to the grocery store in the middle of the afternoon when it’s (thankfully) relatively empty. A relatively empty grocery store gave me the perfect opportunity to sniff out the perfect mango for our turkey burgers. And I mean literally sniff it out.

I’d never bought a mango before and I really wanted to get a good, ripe one to eat that same day with dinner. All I had to go on was the fact that I remembered Wing telling me she always finds a good mango by its smell. Well I stood in the produce aisle of my local Super 1 for a good five minutes (it felt like an ETERNITY) squeezing and smelling every mango I could get my hands on. And I didn’t smell a thing. Not. A. Thing. Not even one tiny hint of a ripe mango. I knew that at least one of them HAD to be ripe. So finally, utterly frustrated and sweating and swearing under my breath, I grabbed a yellowy-red, soft to the touch, completely scentless mango and ran.

That evening as Wing and I discussed the proper way to cut up the troublesome mango (we have since attempted to educate ourselves with this allrecipes.com video, but we found it more amusing than helpful), I silently hoped that my scentless mango was ripe. Lucky for me, it was. It was a wonderfully ripe, juicy, and delicious topping to these tasty burgers–well worth those agonizing moments in the grocery store.

Curry Turkey Burgers

Recipe adapted from Natural Noshing, where it was adapted from Rachael Ray

Ingredients

1 1/4 lbs lean ground turkey breast
1 egg, lightly whisked
1/3 cup minced red onion
3 Tbsp finely chopped fresh parsley
1 Tbsp fresh minced ginger
2  minced garlic cloves
1/2 finely chopped red bell pepper
sea salt to taste
1/2 tsp ground cumin
2 Tbsp curry powder

For serving
hamburger buns, toasted
lettuce
slices of fresh mango
slices of red onion
slices of tomato
yogurt dressing, optional
Directions
Combine all burger ingredients in a large bowl (ground turkey through curry powder). Form into 4-5 patties, depending on how large you make them (I made 4 from this amount of meat).
Cook the patties in a little olive oil over medium-high heat, approximately 5-7 minutes, until cooked through.
To serve, add lettuce, tomato, mango, and/or red onion. I used only mango and an easy yogurt dressing and it was DELICIOUS! (yogurt dressing: 1/3 cup plain nonfat yogurt, 2 Tbsp mayonnaise, 1 tsp lemon juice, salt and pepper to taste)

Peanut Chicken Salad

It may have started with pie, but my love of food has definitely expanded beyond the world of desserts and baking. This is mostly because for the last year or so I’ve been living in a real house, not a dorm room, where I can cook real food. In the beginning I a bit nervous (or maybe laziness was involved as well?) and stuck to easy recipes from home. But then, as I was slowly learning to become more adventurous, I discovered food blogs AND my sister introduced me to foodgawker. I was hooked. In love. Now one of my favorite pasttimes is to browse recipes (not to mention admire beautiful photos and discover great new blogs) on foodgawker.

My fascination with cooking has especially increased this summer, since my housemate and I vowed at the beginning of the summer to try to eat well. Eat well as in cook and eat delicious food (and be healthy about it). And I think we’ve done a pretty good job of it. We stuck with our idea of planning each week’s dinners at the beginning of the week and have found lots of tasty, simple recipes (many from foodgawker!) that have become regulars on our dinner list. And this peanut chicken salad is close to the top of that list.

When I first suggested making a chicken salad, my housemate Wing made a face. She loves chicken, but hates salad. But we made this salad again the very next week, mostly because she begged me to. It’s just that delicious. It’s crunchy, salty, and sweet. And so easy!

Sesame oil is the secret ingredient in this recipe. It gives a very distinct flavor to the dressing. I also like to add a splash of sesame oil to the oil that I cook the chicken in. The first time I made this I pan fried boneless, skinless chicken thighs in vegetable oil, with a bit of sesame oil added. It was SO good. The thighs were perhaps an unconventional choice when the desired result was cubes of chicken, but the juicy dark meat was perfect in the salad. It’s also very simple to scale this recipe up or down, depending on how many people you need to feed.

Peanut Chicken Salad

Recipe adapted from Allrecipes.com

Dressing

1/4 cup sugar
1/4 cup cider vinegar
1 1/2 teaspoons sesame oil
1/2 teaspoon salt
Dash pepper

Combine all ingredients in a glass jar with a tightly fitting lid. Shake well until combined. (I usually use about 1/2 to 3/4 of the dressing on the salad.)

Salad

lettuce
2 cups cubed, cooked chicken
1 (15 ounce) can mandarin oranges, drained
1 cup crunchy chow mein noodles
1/2 cup roasted peanuts

Combine ingredients in a large bowl, add the dressing, and toss to coat.

Enter your email address to follow this blog and receive notifications of new posts by email.

Join 8 other subscribers